A few years back I started giving my wife Funko POPs for holidays, anniversaries, life moments, etc. We decided the theme of her collection would focus on strong women, and has grown to include characters such as Agent Carter, Squirrel Girl, Amy Farrah Fowler from Big Bang Theory, Velma from Scooby Doo, etc.
Recently she wondered out loud if a Ruth Bader Ginsburg Funko POP existed. Not being sure, I did a quick Google search, and sure enough, she didn’t. (Update: She now does! Although it’s the recent RBG, so if you want the younger version – read on!) However, I did come across several different custom versions through various artists such as Feminist Funko which served as an inspiration to figure out how to do my very own first custom POP!
Let’s be clear, by following this tutorial your end product will be a handmade, one-of-a-kind gift for whoever in your life you think needs a young RBG POP. And it will come in at a cost lower than some of the custom artists prices. But my end product was far from perfect. The paint got a little sloppy in places, the molded pieces weren’t particularly polished, but at the end of the day, my wife loved it because I made it myself. If you’re just looking for something with true artistic quality and no DIY effort on your part, pay an artist what they’re worth for their time, materials, and skillset.
So, I started looking into creating my own Custom Funko POP. I looked at reference examples from various sources, including actual photos of RBG, and came up with something that works pretty well! So, I decided to post a little how-to guide for anyone interested in creating their own RBG Custom Funko POP!
Now, you may be reading this and saying “Woah, that’s way too crafty for me. I’m just not that talented.” Well fear not, intrepid reader! If you can boil water, play with Play-Doh, and do some simple painting – you can do this!
What you’ll need:
For this custom, I did a basic head swap – aka, I bought two off-the-shelf Funko POP characters and swapped one head onto the other body.

I realized early on that several custom POP figures of various judges used the body of none other than Lord Voldemort himself! The robes work, and the wand can fairly easily become the gavel. I picked one up for about $10 on Amazon, but you might find a better deal, especially if you can find a dinged up box or loose figure on eBay. We’ll be painting the robes to a more judge-like black, covering the wand with a gavel, and painting the hands a flesh color to match the head. (I also filed down his nails just a bit to make them less creepy looking for RBG.)

For the head, we ultimately need a female figure with glasses and a ponytail. For my version, I settled on Felicity Smoak from the show Arrow. Now, she’s been retired, so the cost of those has gone up since I wrote this. I found a used one on eBay for about $15. If you’re looking for a cheaper and similar alternative, check out the Abby Yates Ghostbusters Pop. Similar, but not quite the same. Then again, it’s your one-of-a-kind version, so why not! We’ll be painting her hair dark brown, and making the lower part of her glasses black to match the top.
Along with the base POPs, you’ll need some acrylic or model paints – available at any craft store – specifically black, white, and a brown. For the flesh color I blended the brown and white, and added a little yellow because the brown I chose was a little on the grayish-green side of the spectrum.
The last thing you’ll need is something for the accessories you’ll be adding – gavel, scarf, etc. You can use an air-dry modeling clay for more custom and detailed pieces. FYI – You do NOT want the oven bake stuff, as POPs do not go in the oven or you’ll get a melted mess along with toxic fumes. This go round I started out with some Crayola air-dry stuff figuring my kids could use the rest, and although it started out seeming like it would work great, when it dried it became very crumbly and I had to start over.
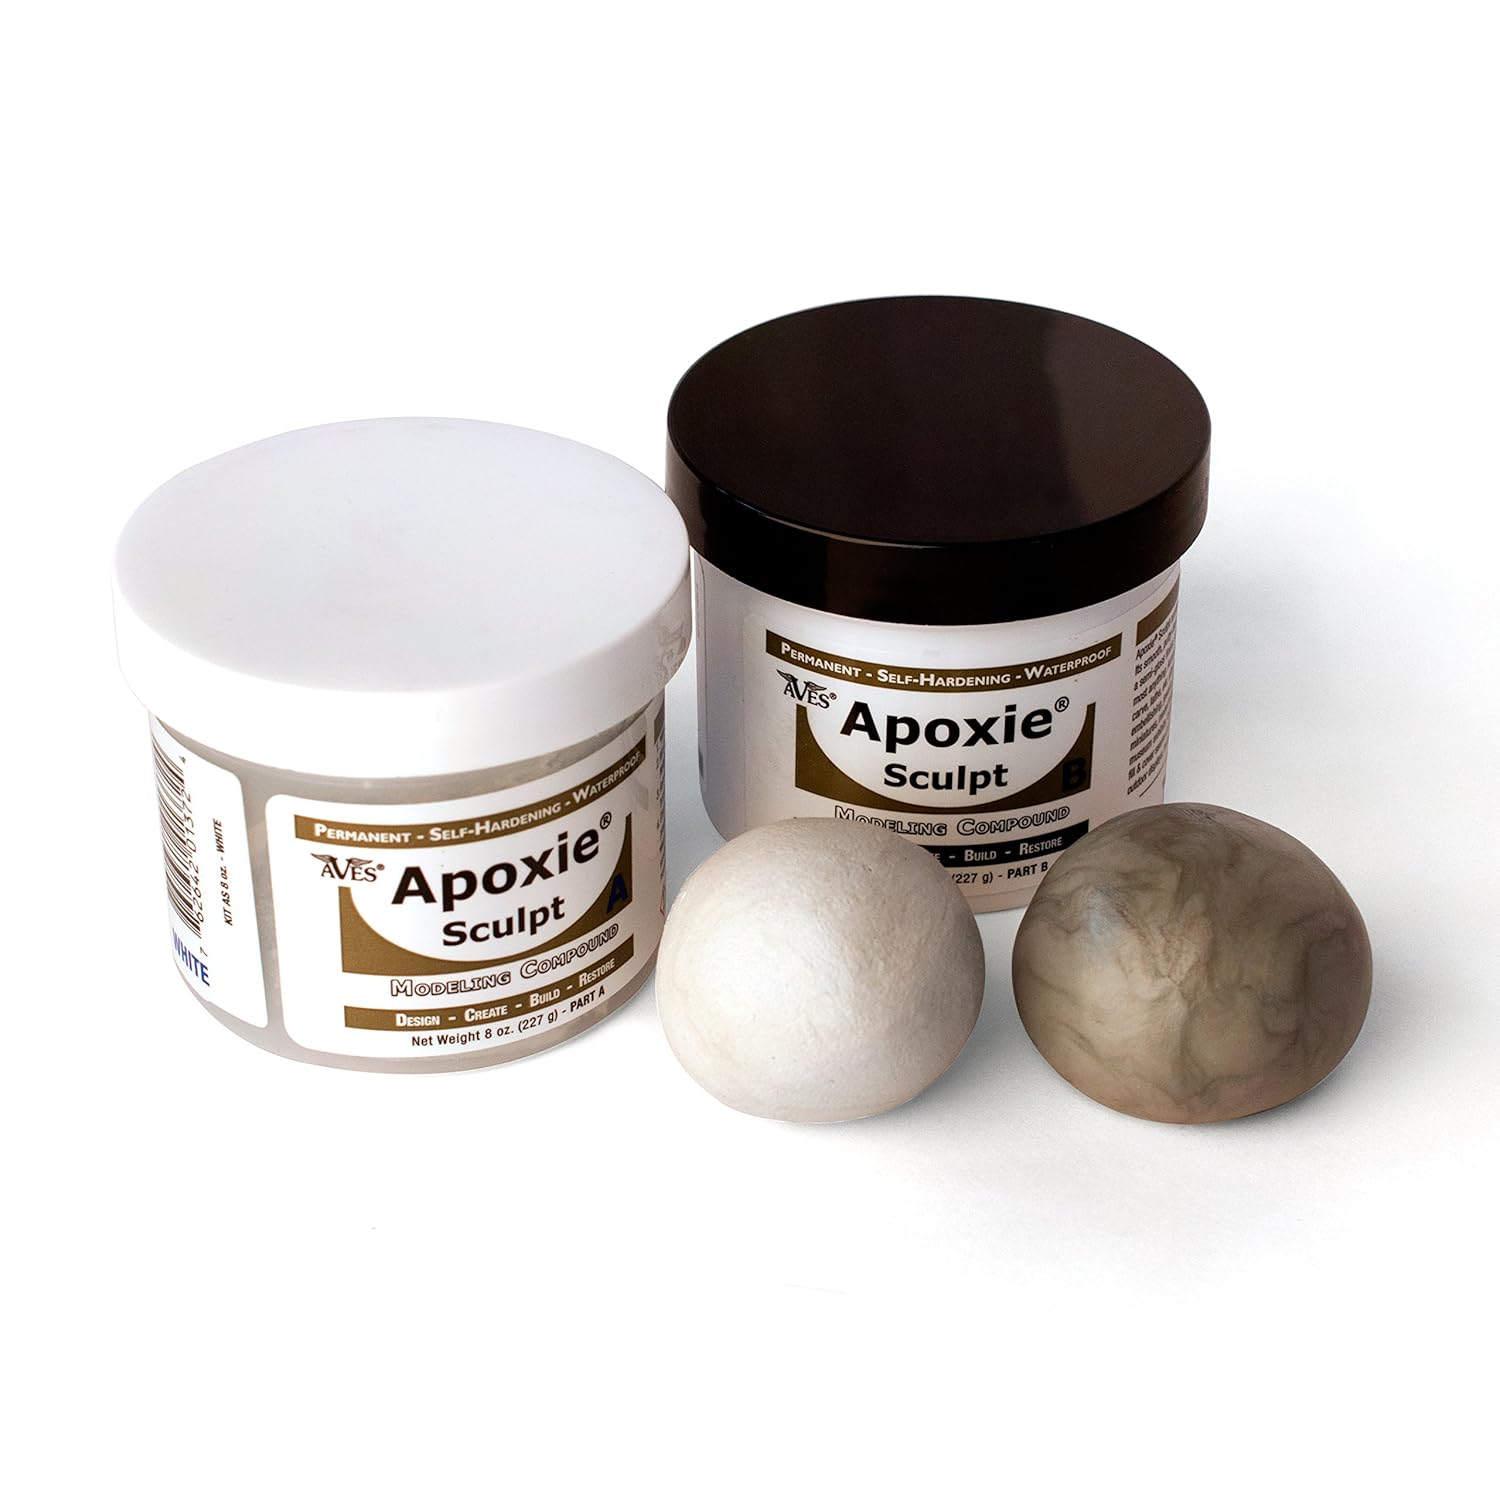 The pros use epoxy-based stuff, which comes in two parts that you mix. It shapes really well, dries rock solid, and also tends to bond with the figures, whereas the Crayola stuff falls off and has to be glued later. (Boo.) In my case I happened to have some epoxy wood putty left over from a home improvement project, and used that, but I do recommend the epoxy-based stuff over the other stuff if you’re going to model your own accessories. This is the pricey piece, coming in around $20, so if you only plan to do this one custom POP, maybe look into alternatives.
You can do her accessories WITHOUT this stuff, if you get a little more creative. I’ve sen ones that have used some bedazzling beads to create a necklace and maybe some gold glitter glue to outline the shape, or stuff to add earings. (RBG loves scrunchies, so you could add one of those if you wanted!) You could create the gavel with a small dowel rod drilled to go over the end of the wand. So really it just depends on how much you want to improvise.
How to put it all together:
Here’s the abridged version – take Voldemort’s head off, take Felicity’s head off, put Felicity’s head on Voldemort’s body, paint and accessorize to your preference!
For those after the details, read on!
First up, you’ll need to boil the POPs. That’s right, you heard me, BOIL them! There’s some YouTube videos on making custom POPs that will walk you through this process, such as this one, but here’s the basic rundown:

Voldemort prepares to get dunked.
Boil up some water in a pot. Grab yourself a glass container (so it doesn’t melt) that’s about the size of your POP’s head. Once the water is boiled, pour enough into the glass container to submerge the head portion of the POP up to the neck. Hold the POP by the body with the head under water for a few minutes. After a little while, the head will have shifted from hard to soft and squishy, indicating it’s ready for the next step. Just remember, this water is boiling hot, so proceed with caution. I wore OveGloves, but occasionally they would dip into the water and then I had scalding hot fabric touching my fingers. (Not fun.) Also, beware, the head can fill up with water like a kids bath toy, so be careful of that boiling water escaping as you pull the head off!
Now, the tutorials I found have you pry apart the plug portion from the head, leaving a disc shaped portion on the neck. However, with this combination of bodies and heads I discovered the plugs are different sizes, so we won’t be following that plan. Instead, once the head is soft, we’re going to pull the head and plug entirely off the neck. With the plastic softened, the entire head should come off without destroying the neck tab. Just as an FYI, I didn’t realize the plug issue until I was ready to remove Felicity’s head, so you’ll see the plug in my pictures, disregard it, as you’ll be removing the plug from Voldemort’s body.
 Now, you can put Felicity’s head on before doing any paint, however, I found it easier to paint the body while it’s separate. Otherwise, you run into issues under the head trying to get the shoulders, etc. I painted her head AFTER I put it on the body, so I wasn’t submerging the paint in boiling water.
So, paint the robe black, and while you’re at it, you can paint the hands a color that matches the skin tone of the head.
Now we’ll soften up the bottom of Felicity’s head with the boiling water. You could do this at the same time as you remove it from her body, but my recommendation is to do this step separately so the top of her head is solid, and only the plug portion is getting softer so it flexes around the plug on Voldemort’s neck piece. Make sure you get it all the way down so her head is touching her shoulders, otherwise you’ll get a weird bobble head effect later.
 With the new head on, paint her hair brown, paint the bottom half of the glasses black, and whatever accessories you’ve added the correct color scheme. Just take your time with the paint, the more careful you are in not getting paint smudges in the wrong places, the happier you’ll be with the end product. I’m not a super awesome detail painter, so I struggle with this step a little – you’ll notice her eyebrows are a little less than precise. But, as you can see with the end product, she’s recognizable, and my wife loved her.
So, give it a shot, be bold, and with a little work you can make your own custom POP to wow and amaze your soon-to-be-jealous friends!


Hey! I’m really interested in doing this for my mom but the Felicity pop is pretty hard to get ahold of! Do you have any recommendations for other possible heads? Thanks!
LikeLike
Hi there! Sorry, I’ve been away for a while with holidays and whatnot and didn’t see this until just now. Finding a usable head was tricky for this one. I’m still not sure what the reference custom I found used, but Felicity was the closest match I could find. That being said, I did consider using Abby Yates from Ghostbusters. She has the glasses and pony tail, but her pony tail goes up instead of down, so it’s not quite as close. But, she would probably only cost you around $10 or so. That being said, if you keep an eye on eBay, you might be able to find Felicity for around $15-20. Best of luck in your endeavor!
LikeLike
You really should’ve given credit to the original artist, especially if you’re using their pics.
LikeLike
Hi there! Thanks for the feedback. Sorry for the delayed response, I don’t check this very often.
You are correct, I should have cited where the picture came from. In my original Google search it led to a Pinterest page that didn’t cite the source. I have removed the picture as it wasn’t totally necessary to my post (simply providing some of the original inspiration) and intend to provide a link to the Facebook page for the artist (Feminist Funko) which another person point me to in a previous comment.
I’ll be revising the article overall as several changes have occurred, including an official RBG POP(!), and the Felicity Smoak POP being retired and hard to find.
Thanks again for the feedback, I’m always looking to improve.
LikeLike
This is my friend’s design. If you’re going to post her pictures without permission, the least you can do is credit her. FeministFunko.
I also think it’s in poor taste to take somebody else’s work and tell everyone how to make it instead of buying from the original artist. You could have shown how to make your RBG design without putting down another artist in the process.
LikeLike
Hi there! Sorry for the delayed response, as you can probably tell, I don’t post often, this is mostly a place I can hone my writing skills and provide a little creative instruction for my students from time to time.
First off, thanks for the feedback! As an educator I’m always looking for ways to learn – whether it be making my first custom POP (woo!) or being better at sharing projects like this with those who want to read about them and maybe take their first steps into doing something creative.
My apologies to your friend, when I originally found the picture it came from a Google search which led to a Pintrest page, which didn’t site the source. (So I appreciate knowing where it came from!) You are correct, I shouldn’t have posted it at all without a citation, and my intent was simply to show one of my original inspirations for the project. The picture has now been removed, and I intend to do some revisions to the post regarding the tone (which upon reread could be read as more condescending than providing a budget-friendly alternative). My intent was not to put down another artist, merely provide guidance for those with a DIY mindset.
Several of my friends are local artists who do custom work, including POPs, and I do believe that artists should be paid adequately for their skill sets, so although $60 is a bit steep for the casual POP collector, it’s a fair price for the time and materials of a craftsman like your friend. No one in their right mind would look at the quality of my final product and deem it worthy of paying money. It’s clearly a handmade, one-of-a-kind product, as would be the end result of anyone following my basic instructions. My wife loves it, and for the small few who actually read my post and decided to follow it, I’d hope the individual they make it for would appreciate their efforts as well. But for those looking for a higher quality result, or those who have zero desire to explore DIY projects, artists like your friend are clearly the way to go.
I do disagree on your second point, however. I did not tell anyone how to make your friend’s custom POP, I told them how to make MY custom POP. If you look at the two, you’ll see that there are distinct differences between them. The body is the same, but I would no more fault me for sharing that information than your friend for simply re-purposing an existing Voldemort Funko figure. In fact, I drew inspiration from several custom ideas as well as pictures of RBG for my final design, so my final product is distinctively my own.
Ultimately I’m an educator. My job is to empower others to grow and succeed in their own pursuits. I would guess that much like myself in my professional work (of which the occasional custom POP is not one of them) that your friend was mentored or guided by others doing custom art, either through a personal teacher, a YouTube video, or drawing inspiration from others work. That’s part of the process. If we hoard our knowledge and shut people out looking for information, then we do serious harm to the next generation of artists and deny them a crucial element that we ourselves benefited from.
So, again, I’ve removed your friend’s picture, and intend to add a link to her Facebook page mentioning that she inspired me to try my hand at making my first custom POP. The entire article needs to be revised anyways as Funko has now officially released an RBG POP (although the current, mature version), and the head I used is no longer readily available.
I assure you, my intent wasn’t in any way meant to be negative toward your friend or her work. It’s kind of you to speak up on her behalf, and feel free to pass along my apologies directly.
LikeLike